Saturday, May 14, 2016

Paragraph Organization

While working with a fourth grader I noticed she could work on her paragraph structure and organization. So I again busted out my fancy anchor chart making skills to do the typical hamburger paragraph. I also added some transition words to the side to help remind the students of words they can use to help.

A good paragraph needs:
  1. A topic sentence
  2. At least 3 good details
  3. A good closing sentence
  4. and for fourth grade at least 6-8 sentences

Capitalization

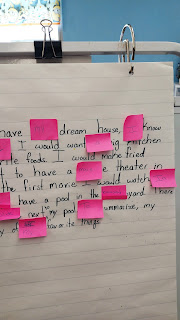
During one of my lessons I realized a fourth grader I was working with could use a reminder of when to capitalize letters when writing so I wrote a lesson for her about it. We started with a paragraph I had written, full of purposeful capitalization mistakes. We read the paragraph together, then went through it sentence by sentence. She located each capitalization error, then replaced it with the proper letters using post it notes.

 Some of them were obvious to her, while others were a struggle which brings me into my next lesson but we'll talk about that later. She was able to tell that "I" needed to be capitalized but unable to tell me why besides that it looked funny. She was very engaged however, she even asked if I would write her a new paragraph so we could do it again!

Main Idea and Details

While working with a fourth grader for a graduate school assignment we discussed finding the main idea and details in a story. We talked about why good readers find the main idea. We read the first chapter and a half of Brittany the Basketball Fairy by Daisy Meadows.


We used this fancy anchor chart I made to talk about it. Why do readers find the main idea? How do good readers find the main idea?


After the reading of the story as well as a few comprehension questions. My student filled out this graphic organizer identifying the main idea and 3 details supporting her main idea.


She didn't realize she was supposed to write each detail in one box at first. :-P


Mo Willems - Don't Let the Pigeon Drive the Bus!

This week is second grade we've been reading some Mo Willems books. Well the teacher in the classroom had been. She recently got injured so I have been taking over for her. I read with them "Don't Let the Pigeon Drive the Bus!"

I read the book, making sure to use funny voices for each character. After we read it I kept score on a smartboard scoreboard (just because using the smartboard always gets their attention) of how many kids would or would not let the Pigeon drive the bus.

I decided to mix a little fun with a following directions activity. The kids had been wanting to draw the pigeon so I decided to do a how to draw the Pigeon on the smartboard. So on the smartboard I had them follow me drawing the Pigeon one slow step at a time. A lot of them felt they couldn't do it but I reassured them that when you go one step at a time and take your time it becomes much simpler. After each step I had the children put down their pencils so A. they wouldn't try to go ahead of me then complain when their Pigeon was jacked up and B. so I could scan the room and not go forward until everyone was ready. Their Pigeons came out great and they were surprised at how well they did with their own hands and a pencil. When they were done I let them color them in.

I also thought I could cross it over into the math we had been learning which is about bar graphs. So I drew a cute chart and had each student come up and place their newly drawn Pigeon pictures on a bar graph for whether or not they would let the Pigeon drive the bus.


Friday, April 22, 2016

Theme Anchor Chart

Yesterday I was helping out with a second grade class. They were doing a writing activity on a story they read that week. One of the questions was "What is the theme of the legend" and a lot of them were answering with the main idea of the story. I ran that by the teacher and she said ok we'll need to go over theme a little more. So I made this cute anchor chart to help define what theme is and give some of the most common themes in kids' stories.

Disclaimer: I did copy this from pinterest so if you've seen one that looks like this... I copied it.

Wednesday, April 20, 2016

Friendly Letter Writing

This week I worked subbed kindergarten and we began talking about writing friendly letters so I made this fancy dancy anchor chart to begin talking about the parts of a letter.

I know some of the parts are difficult to read but it includes and labels the Date, Greeting, Body, and Closing. I also points to the parts that need to have capital letters and commas. I also took this time to introduce them to the word indent. Throw in some writing vocab.

But I also taught second grade this week


When doing this one the first thing I changed is I realized I forgot to label the Signature as separate from the closing. I again labeled the parts that need capitalization and commas as well as indent. I also wrote out what each part means to help get into the vocab a bit more.

Date- the date the letter was written
Greeting- Usually starts with Dear followed by the recipient's name and a comma
Body - The main message of the letter
Closing- The place to tell who wrote the letter. You can use Sincerely, From, or Love followed by a comma
Signature- The place the writer signs their name

Since this was an example of a thank you note, the parts you see underlines are labeled "opening question" and "the reason you are thanking the person".
Check In, Chew Out

I'm really excited this week, I have been asked to be a Check In, Check Out person at the school I work at.
I know. I'll explain.

Check In, Check Out is a program in our building where students who are struggling with behavior meet in the morning with an adult in the building (who isn't their teacher), and discuss some personal behavior goals for the day. Their teachers and special teachers give them points for how well they did on that goal during different points in the day (math, science, special, etc.).

The reason I am excited is because I kind of feel honored that my coworker feel that I would be appropriate to work more closely with a student and work on their behavior.

One of the things her teacher and I have recently noticed is she has some oral sensory needs. She is a second grader and she often has her hands in her mouth, is blowing spit bubbles or chewing on things like pencils but really anything she can get her hands on. Her teacher has been giving her gum and straws to chew which has been helping her to focus more on getting work done but those are more temporary solutions. I was looking around pinterest

aka teacher heaven

and found this website. They sell oral sensory items such as chewers that go on the tops of pencils and "chewlery" which are necklaces and bracelets that are made to be chewed on. They even come in different toughness levels for mild, moderate to severe chewers. I'd like to purchase one for her and see how it works.

I hope that I can do a good job as her Check In, Check Out person. I have been informally working with other students in the building on their behavior so it feels good to be trusted to do it more formally.