Friday, July 31, 2015

T Week- Teeth

This one came out looking a little creepy but I had some things on my mind this week and I kind of planned it last minute.

What you'll need:

  • Construction paper
  • Glue
  • Markers
  • Scissors
What to do:
  1. Cut some red construction paper into a half moon shape to make the mouth.
  2. Cut some white construction paper into small rectangles.
  3. Glue the red half moon onto a sheet of construction paper, preferable a color that matches a skin tone of some sort since it will be a face.
  4. Put a line of glue across the flat top part of the half moon mouth, and another across the bottom curved edge.
  5. Give the cut out teeth to the children and allow them to glue them to the mouth.
  6. Let it dry, then draw eyes and a nose to create a face.
The finished product:

I know those are some jacked up looking teeth but... oh well.

T Week- T Tree

I went in to work late after an appointment yesterday so I didn't do the craft with my kids and didn't want to take credit for someone else's work. But here's today's craft. I wanted to use the letter T for a craft this week at some point.

What you'll need:

  • Construction paper
  • Marker
  • Glue
  • Ruler (optional)

What to do:
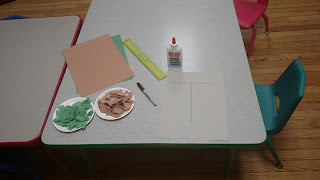
  1. On a piece of construction paper use the ruler to draw a capital letter T.
  2. Shred up some green and brown paper. If you're doing this with older kids you can let them do the shredding.
  3. Make a line of glue on the vertical line of the T and have the children place the brown shredded paper on the glue to represent the bark.
  4. Make a line of glue on the horizontal line of the T and have the children place the green shredded paper on the line to make the leaves.
The finished product:


Tuesday, July 28, 2015

T Week- Tracks

I went into work late yesterday so I didn't do the craft with my kids. I didn't want to take credit for a craft I didn't partake in.

What you'll need:

  • Paint
  • Cars
  • Paper plates (or something flat to put the paint on)
  • Construction paper

What to do:
  1. Pour some paint out onto the paper plates. I didn't need as much as I thought so don't use too much as not to waste it.
  2. Originally i ran the cars through the paint a lot to get a good amount of paint on it but I found that the children didn't just do straight tracks so too much paint made it into big smears. I suggest just dipping each wheel into a little paint.
  3. Let the children run the cars on the paper, the same way they would if they were just playing with the cars.
The finished product:


Sunday, July 26, 2015

It Never Gets Old, Trust Me

One of the things that gets me through the hard times is the love and trust that come from the children. That feeling I get when I pick up a child and they put their arms around my shoulders and lay their head on me is priceless. It's that feeling of overwhelming love. They aren't just letting you pick them up, they want you to and they trust you to show them love back. It completely melts me when a child falls asleep on me I have no words for that one. I don't think I could fall asleep in the arms of someone I didn't trust to care for me even while I was unconscious.

I know my kids really love and trust me when I'm the one they run to when they're crying. You generally go to someone who is going to at least try to make you feel better when you're hurt or sad. I hate to see my babies cry but when they come running to me while they're crying I know they expect me to help them. It's just one of those things that shows me they trust me to make it all better.

Friday, July 24, 2015

I Week- Iguana

I want to try each week to make a craft out of the actual upper case letter so I can at least have the children start to know what the letters look like. Finishing out this week we made an Iguana out of the capital letter I.

What you'll need:

  • Construction paper
  • An I cutout
  • Scissors
  • Glue
  • Eyes
  • Markers

What to do:
  1. Glue the I cutout to a piece of construction paper.
  2. Use the scraps from the green paper you cut the I out of to make 4 claws, a tail, and a head.
  3. Glue the 4 claws to the 4 ends of the I.
  4. Glue the tail to the middle of the bottom platform of the I.
  5. Glue the head to the middle of the top platform of the I.
  6. Attach the eyes upside down to the head.
  7. Draw a tongue above the head. I also drew spikes on it's back but I don't remember if Iguanas have spikes. But I didn't feel like being anatomically correct was that important.

Here's the finished product:

Thursday, July 23, 2015

I Week- Ice Cream Sundae

So I don't really feel like this was my best craft after it was finished. I see a few things I could have done better after they were done but you win some you lose some. If I ever do it again, I'll know what to do to improve it.

What you'll need:

  • Construction paper
  • Tissue paper (optional)
  • Coffee filters
  • Markers
  • Glue
  • Scissors
  • A spray bottle with water
  • Paper towels

What to do:
  1. Draw a half moon shape on a piece of construction paper.
  2. Cut out the half moon and glue it to a full piece of construction paper.
  3. Have the children color 2 (or 3) coffee filters with markers.*
  4. Spray the coffee filter with water. I don't suggest you saturate it but the smudge color effect won't take with too little water. I found 2 misty sprays to be a good place.
  5. Set the wet filters on a paper towel as the color will leak onto the table. Allow them to dry (shouldn't take long.)
  6. Glue the filters over the half moon shape to simulate an ice cream sundae.
  7. I chose to cut out a cherry from red tissue paper to make it look more like an ice cream.
The finished product:

What I would have done differently:
  1. I would have glued down the coffee filters first and the bowl over top of it too look more like scoops inside of a bowl instead of colored circles floating over a bowl.
  2. I would have made sure the bowl cut out looked more like a  bowl
  3. I would have places the cherry on one of the scoops instead of in the middle (I did that on the kids' though when I realized this)
  4. I would have added a spoon or something to make it look more like ice cream.


*Note I found after the first 2 I did that the coffee filters were much too big so for the remaining children I cut out and just had them color the small center circle in the bottom of the filter.


Wednesday, July 22, 2015

Spy vs Spy

This one is kind of a "you had to be there" to understand why it was funny moment but my coworkers and I laughed uncontrollably and it made my day a little better.

A 3 year old asked my boss if he could go into the room next door where some of his friends were playing. We were already in the process of transitioning all the kids in the room over to that room anyway. In her funny teacher voice she whispers "Sure but it has to be our secret." He took that to mean that he should hunch over and tip toe out of the room like some tiny spy. It was hilarious.

What Kind of Pie?

Today I was getting my kids ready for nap time and an older child from the school age room walks into my classroom.

Kay: There's pie out in the hallway.
Me: OK?
Kay: My teacher told me to come tell you in case you wanted any.
Me: OK thank you.

I was running late this morning and didn't have a chance to make lunch so I figure I would just buy from a local restaurant. I went to tell my boss so someone could watch my room until I came back.

Me: I don't have any food I need to go buy some when my kids go to sleep.
My Boss: Why? There's pizza right there didn't Kay just come in and tell you?
Me: *Laughs my head off* She said there was pie out here I didn't know she meant pizza!

Fast Food = Filthy Rich?

This post is purely my own opinion and I speak for only myself. This is the article from which I got my information.

When I first heard about fast food workers arguing for $15/hr I thought it was absolutely ludicrous and never thought it had any merit let alone actually coming through, and yet it has.

I worked at Mcdonald's when I was 14... 14!! There's about to be 14 year olds making more money than the military, teachers, caregivers, people which expensive degrees and physically demanding jobs. I understand the cost of living is high but what I don't understand is why this only applies to fast food workers. Why not raise the minimum wage? People who work other minimum wage jobs don't face the same cost of living problems? Everybody and they mama about to quit their job and go work at damn Burger King.

And honestly like I said, I worked at Mcdonald's when I was 14, that is who should be working at Mcdonald's not grown ass people who are trying to support themselves or a family. If you want higher wages get a better job. Now of course I don't think it's just that easy to find a good job especially when you have no degree (even no high school degree), or a conviction on your record or whatever other obstacles. But still, I take care of people's children, the most important thing in a person's life the most precious thing to them, and I don't make nearly $15/hr.

Then the workers want to be mad that this is going to be a gradual increase through 2018 and 2021, not an outright raise. Get the whole f*** out of here.

I Week- Ice Cube Painting

I thought this was pretty creative, painting with ice cubes. It comes out looking like water colors but it's more fun to get something more creative than just giving the kids paint and brushes going.

What you'll need:

  • An ice cube tray
  • Water
  • A freezer
  • Food coloring
  • Popsicle sticks (or toothpicks but they can be a little dangerous for young children)
  • Tape (or plastic wrap)
  • Construction paper


What to do:
  1. Fill the ice cube tray with water.*
  2. Add one drop of food coloring per ice cube. I decided to do each color more than once in case anything happens to one, it melts too much or falls off the stick.**
  3. Cover the ice cube tray with tape or plastic wrap. I chose to use tape because that was what I had available to me off hand and it is sturdy. I just cut slits into the tape over each cube.
  4. Insert a popsicle stick into each cube.
  5. Place the tray in the freezer to form ice cubes.
  6. Remove the tray a few minutes before you're ready to use them. The ice cubes need to be slightly melted for this to work.
  7. Remove one cube at a time and smear it on the paper as if painting with brush. Keep in mind that the color isn't going to come from the cube itself, it acts as a brush for the colored melted puddle of water each cube will form so if it becomes hard to see just dip it back into the cube spot it came from.
  8. If the cubes become too melted to the point that the stick is touching the paper more than the ice cube, stick them back in the freezer and revisit the activity in a few minutes. The puddle will  become part of the ice cube again.
The finished product:

*Note you don't want to fill them to the point where the ice cubes will connect when they freeze. The colors will run together when you add the food coloring.
**Note the food coloring crawls up the the edges of the cube area to anywhere there's water. It will get a little messy and I learned the hard way that food coloring stains more than markers almost.

Tuesday, July 21, 2015

I Week- Igloo

Kept it pretty simple today. It was blazing hot so I thought we'd at least pretend we were some place cooler and make igloos.

What you'll need:

  • An igloo cut out
  • Construction paper
  • Glue
  • Cotton balls

What to do:
  1. Cut out your igloo and glue it to a piece of construction paper. I just chose blue cause it seems... cold. I guess.
  2. Talk to the kids about what an igloo is.
  3. Spread some glue on the igloo and have the child place the cotton balls on the glue.
  4. If you want to sweeten it up use marshmallows instead of cotton balls!
The finished product:
I know it seems pretty simple but sometimes you have to keep it simple with 2 year olds.


Monday, July 20, 2015

I Week- Insect (The Very Hungry Caterpillar handprints)

In my school the classrooms have a line where we clip up the kid's projects for the day along with any notices that need to go to all the parents. I have decided to change it from the flowers we currently have in my room to handprints that form The Very Hungry Caterpillar. Each child's handprint makes a part of the body and one child's handprint is the head to the caterpillar.

What you'll need:
  • Green, blue, brown, and red paint
  • Paper plates (or something to put the paint on)
  • Construction paper
  • Scissors
  • Clothes pins
  • Glue
  • Paint sponges (sponges are better for children's hands, brushes can be a little rough)
  • Something to clean the children's hands with (I used paper towels and wipes so they could play until I had everyone finished and could wash their hands properly)
  • A laminater (optional)

What to do:
  1. For this craft we're not going to use the children's whole hands. When trying not to use a whole hand don't try to paint the whole hand out of habit and hold down just the parts you want. Trust me, I've seen people do it.
  2. Paint the palm of the child's hand green.
  3. Paint all the fingers except the thumb blue. This will create a body part section, and some of the legs. The thumb would be in a strange spot for a leg.
  4. For the head, paint the child's palm red, and the index and ring fingers brown.
  5. Draw eyes and a smile to create a face.
  6. I chose to laminate mine before gluing the clothes pins on the back. I also wrote the children's names above and below the prints instead of through them like I originally intended.
Here's the prints together so you can see how they make a caterpillar:

And here's how they look hung up. This picture is bad I know but it's the best I could do with them being so far apart from each other.


Sunny Door Decoration

So I have FINALLY finished my door decoration.


It came out pretty much how I wanted with all of my kids represented and participated. Click here to see how we did the center of the sun and click here to see how we did the handprints.

Friday, July 17, 2015

G Week- G Goat

To finish out G Week we made a goat using the letter G. Similar to last weeks Yak using the letter Y. It actually does look kind of like a cute little goat.

What you'll need:

  • Scissors
  • A G cutout
  • Construction paper in different colors
  • Glue
  • Eyes

What to do:
  1. Cut out a G and glue it to a piece of construction paper.
  2. Clue out two horns, two ears, and a small goat beard.
  3. Guide the child to gluing the horns on the top of the G, the ears just under the horns, and the beard just before the crook in the G.
  4. Place an eye near the start of the G.
The finished product:


Thursday, July 16, 2015

Adorable Anecdote

I have a kid in my class who's parents got him a potty watch. Its a small toilet shaped watch that lights up and plays a song every 30 minutes to tell him to go potty. It sounds annoying but it's actually not it's pretty helpful for him. Anyway the watch went off and when we went to go potty I noticed his pull-up was wet. I said "uh-oh what happened why is your pull-up wet" and he goes "Zoey did it!" I have never laughed so hard. I was like excuse me did he just look in my face and blame someone else for wetting his pull up?! It was hilarious. I thought he was talking about a girl in our class named Zoey but when I told his dad this story he laughed as well but he said he says that sometimes because his mother's dog's name is Zoey. That didn't make it any less funny to me that he just off top blamed someone else for his pull-up being wet. It's the little moments that keep ya goin'.

G Week- Goldfish Bowls

I almost feel stupid for missing something so obvious while I was planning this. I wanted to do a goldfish bowl it seemed something simple I could do with the kids and I couldn't think of what to use as the goldfish! I knew not to expect 2 year olds to draw them, so I was mulling around ideas, making them out of tissue paper, construction paper, seeing if I could find a fish shaped stamp or stickers. Then while I was making lunch one of the children had those little goldfish crackers in their lunchbox and *bing!* lightbulb. They're literally called goldfish and are shaped like little fish how did I miss that?

What you'll need:

  • A bag of goldfish crackers (I chose to use the colors ones just for a little bit of extra fun)
  • Glue
  • A goldfish bowl coloring page
  • Crayons

What to do:
  1. Have the children color the fishbowl. Mine had some seaweed in it to I had them color that green and the water blue.
  2. Spread some glue onto the paper.
  3. Give the children goldfish to place on the glue.*
The finished product:

*Note I handed the goldfish to the children one by one so they wouldn't eat them while I wasn't looking but I did let them eat some when we were done.


Sweet Window Decorations

It took me a while to decide what to make to decorate the windows in my classroom. I wanted to use the kids' names and I wanted to have them help make them. But I was back and forth about that for a while because it has been a few weeks and I'm taking way too long to finish my decorations so I was thinking I would just do something myself but I thought of something simple to get the kids involved. I made pieces of candy and lollipops that the kids finger painted.

What you'll need:

  • Finger paint
  • Construction paper
  • Straws
  • Tissue paper
  • A marker
  • Glue
  • Something to trace a circle with
  • A smock (optional but I always recommend a smock of some sort when painting with small children)

What to do:
  1. Place a smock over the child and a piece of construction paper in front of them. 
  2. I gave each child a choice of 4 colors, let them choose one color, finger paint smear it on the paper, then choose one more color and mix it on the paper.
  3. After the paint dries, turn the page over to the back and trace a circle. Cut the circle out.
  4. There are two options to do from this point, make a candy or a lollipop.
To make a candy:
  1. Cut out two long rectangles with the tissue paper
  2. Fold the tissue paper accordion style, then twist one side of it.
  3. Glue the twisted sides to the back of the circle and fan it out to make it look like the ends of a candy wrapper.
  4. I wrote the children's names on their creations.


To make a lollipop:
  1. Write the child's name on the front and surround it with a large swirl to imitate one of those old school huge lollipops.
  2. Glue a straw to the back of the circle.*
*Note the glue that I used didn't hold so well after a while and the straws were falling off so I re-glued and also put some clear tape over the straws.


Wednesday, July 15, 2015

G Week- Gumball Machine

I happened upon a box of upper case alphabet stamps in my classroom and decided to use them. Today we made a gumball machine.

What you'll need:

  • Letter G stamp
  • Ink pads (optional)
  • Scissors
  • White and red construction paper
  • Something round to make circles in the construction paper
  • Glue
  • A marker

What to do:
  1. I used a small toy plate to trace a white circle and cut it out.
  2. Let the child choose which color ink they'd like and stamp away at the circle with the G stamp to imitate the gum in a real gumball machine.
  3. Glue the circle just higher than the middle of the page.
  4. Drawn the rest of the gumball machine with a marker.
The finished product:


Tuesday, July 14, 2015

G Week- Giraffe

This is another one I'm proud of because it came from my brain through a few different ideas I eventually landed on this. I was originally going to have the kids color a white paper with a yellow crayon and find something round to make brown dots with paint but I wasn't so into the idea. Then I found a brown bingo stamper which, hello, is perfect cause it's brown and it's already round. Well lets just get to it and I'll show you how it ended up.

What you'll need:

  • Yellow and green construction paper
  • Brown bingo stamper
  • Scissors
  • Glue
  • A black marker
  • A pencil
  • A Giraffe cutout or stencil

What to do:
Now as you can see I do have a picture of a giraffe that I printed to trace. Why didn't I just have the kids color that? Because they're two and they wont stay in the lines it'd just be a yellow and brown mess. Plus I like to be a little more creative than just coloring when I can.
  1. Give the child a yellow piece of paper and the brown bingo stamper and let them go to town on the paper. Smaller children may need help cause they seem to not understand the difference between a bingo stamper and a marker.
  2. After giving the brown stamped page a little time to dry (it may not even need any unless they stamp super hard), turn the paper over and trace your giraffe with the pencil.*
  3. Turn you new giraffe to the front and enjoy how giraffe-y he looks. Don't forget to give him some giraffe features with your marker, a smile, a nose, an eye and ears, I also gave mine a mane and hooves.**
  4. Lastly, I wanted my giraffe to have some grass to roam on so I glued him to the green construction paper, making sure to put the glue on the giraffe not the paper.
The finished product:

*Note I chose to trace it on the back because I didn't want any pencil or eraser marks to show plus I think it adds to the creativity to not know exactly where the brown spots will land.

**Note if your giraffe stencil doesn't have a picture you may want to draw your features with a pencil first then go over it with the marker.

Monday, July 13, 2015

Water Woes

Today we took the kids into a sprinkler on the playground. It is BLAZING hot here. Some of the kids were a bit stand offish  but eventually started running through the water. One little girl was so mesmerized by the spinning of the sprinkler head I'm not even sure she realized she was getting drenched standing so close for about 20 minutes. But she laughed and played after a while. I had one other little girl who was ok to put her hands out and in the water if I held her but that was about it. One boy had the same reaction except that he wanted me to hold him the whole time or hugged my leg even when I got him out of the water and assured him he didn't have to go in if he didn't want to. You can see how this became a little difficult trying to keep 5 two-year-olds in one area of a playground by myself. Eventually some of the other kids ran through it and enjoyed it so I count 3 out of 5 as a success. I don't know how often I will be expected to do this so it'll be interesting. I did add to my list of life experience lessons that it takes a long time to change 2 year olds into bathing suits. I was way off schedule this morning.

G Week- Garden

G seems like it'll be a much easier week to come up with activities for than Y week. So to kick it off I'm using an old soda bottle trick I learned while I was living in Buffalo and turned it into a garden.

What you'll need:

  • 1 bottle per color paint you want to use (make sure they're soda or seltzer bottles not water bottles. They need to have the 5 points on the bottle not a flat surface)
  • Paint
  • Paper plates
  • Paint brushes
  • Construction paper


What to do:
  1. Pour out some paint onto each plate*
  2. Dip the bottom of the bottle into the paint. Be sure to cover all the points on the bottle with paint.
  3. Have the child hold the paint with two hands and stamp the bottle on the paint. Dip in paint again if it isn't showing up after the first or second stamp.**
  4. Repeat the process with however many colors you'd like to use.
  5. This next part I did without the kids because I wanted it to be clean. Use a thick brush to paint the bottom of the page with green paint to look like grass.***
  6. Use a thinner brush in the green paint to create stems and leaves leading up to the flowers.
The finished product (I think some of the kids' actually looked better than mine though)


*Note you may want to use a lot of paint or make it into a pile that's tall in the center. There is a small circle in the center of the bottom of the bottle and if you have enough paint it'll reach it and that center dot makes it look more like a flower. You can see what it looks like without it in my example I had a little less paint to work with than I intended.
**Note it's a good idea to hold the top of the bottle to make sure they press it down all the way.

***Note once there's not much paint left on the brush use the paint that's already on the page to brush upward and create the effect of blades of grass.

Friday, July 10, 2015

Y Week- Yak

To finish out Y week we made a Yak!

What you'll need:
  • Assorted color construction paper
  • Scissors
  • Glue
  • Markers
  • Eyes (googly or otherwise)

What to do:
  1. Cut one of your colored papers into the shape of a Y.
  2. Glue the Y to a different color paper.
  3. Using two other colors cut an oval for a snout and 2 horns.
  4. Glue to oval to the lower part of the Y and allow the student to draw nostrils and a smile on the snout.
  5. Attach 2 eyes just above the snout.
  6. Glue one horn to the top of each of the top corners of the Y.
Here's the finished product!


Certifiable!

It is just after midnight on July 10th but I am scheduling this post to go up during the day time. I wanted to write it now because I am soooo excited I had to blog while I still had this feeling. I just received approval for my New York State Teaching Certification!!! I have worked so hard and gone through so many obstacles and errors and whatnot that it is crazy to finally be here! I know this is not the end of the road but this is what I have been working for for the last 6 years and it is a huge weight lifted to get to this point. There are a few moments in your life when you should just be proud of yourself for you. This is that moment for me.

Thursday, July 9, 2015

Top 5 Pet Peeves of 2 year olds

Now I know children are children. These aren't even children these are just toddlers who can't barely talk or express what they want but I'm still a human and I get frustrated with some of the things they do. These 5 things are things that all toddlers do, will do, and are always going to do but they make me banonkers.

5. When they wait until you put a fresh diaper on them or just gave them the opportunity to use the potty... then take a HUGE crap in the new diaper less than 10 minutes later.

4. I don't mind tantrums so much. The crying I can handle but I can't stand when they scream. I don't deal with tantrums I take the child to a safe area where their kicking and thrashing won't break anything or hurt themselves and leave them alone but while I'm watching them. That "pause-in-the-crying-bloody-murder" scream makes me crazy.

3. When a kid hears you tell them something and doesn't do it or respond but looks at you but when you get up and start walking toward them they fix their behavior. You heard me, act right the first time!

2. When they start thinking they're the boss and telling everyone else what to do. And my NUMBER ONE thing that makes me absolutely cray cray...

1.When you tell one kid to stop doing something... and another kid takes that as you telling them to start doing it while they laugh at you.

Here's a Bonus Jonas pet peeve:

Kids who aren't infants putting their hands in their mouths. I know kids learn by putting things in their mouths when they're infants but when you're older than that it irks me. My kids have their hands in their mouth all the time and I'm just like I don't want to pick you up, have you playing with the toys everyone shares, or doing crafts with wet, sticky, smelly hands. It's gross.

How to do Handprint art

I am still working on my new door decoration which we started earlier this week. It won't be done for over a week since I have a student on vacation and I need her handprints. So since today's project was meerly handprints that don't make sense I figured I would just give you a few tips about how to do hand prints.

What you'll need:

  • Paint
  • Paper plates
  • Sponge brushes
  • Construction paper

Tips:
  1. Use a sponge brush, a bristle one may be uncomfortable for sensitive little hands... or it may tickle so much they can't sit still.
  2. Be sure to paint the hand NOT let them put their hand in a big blob of paint. You will have too much paint on the page and it will take much longer to dry and look much sloppier. Especially if you want to do more than one color on a single print.
  3. Some children if they are small enough may not comprehend holding their hand open so don't be afraid to get a little paint on your fingers to open it.
  4. Some kids also do NOT respond well to having their hands or feet painted. The stimulation is just not enjoyable for them. I would suggesting just doing it as quickly as possible I don't think you are hurting them but if they really flip out maybe don't do it.
  5. To engage them make it into a little game while painting, sing a song, make a funny noise. I chose the classic "tiiiiickle tickle tickle".
  6. Have some back up paper handy if you don't have a lot of space and need the whole page done right. Sometimes the kids move quickly and just slam their hands on the page or move them around. Which leads me to tip number 6.
  7. Press on top of their hands while doing the print and count to about 5. This will ensure that the paint will show up nicely and not faded. Also the biggest thing is smudging, if you let a kid just slap their hands down on their own, they WILL move around because they will think it is fingerpaint time.
Hope these helped! Here's how my prints came out today.

They are two toned for the project I am working on. When it is finished I will post a picture, click here to see part one of this project.


Wednesday, July 8, 2015

Y Week- Yo-yos

So I have to say even though it didn't come out perfect I'm pretty proud of this craft because it came from my brain and not pinterest or pinterest inspired. I was originally going to print out a yo-yo coloring page and have the kids decorate them with bingo stampers, then cut them out and put them on construction paper but then I had one of those middle of the night ideas. This was an opportunity to make something that wasn't just on a piece of 2D paper like most of our crafts. So let's get to it.

What you'll need:

  • Small paper plates
  • Bingo stampers
  • Yarn (or strings)
  • Toilet paper rolls
  • Scissors
  • Tape
  • Glue
What to do:

  1. Give child a paper plate and let them pick which color they'd like to stamp with, then let them pick a second one. I used this time to practice their colors and have them say each one they chose out loud. Repeat this step with a second paper plate.
  2. Cut the toilet paper holder into thirds. I found it easier to cut the holder lengthwise and then into thirds and tape it back together into small rings.
  3. Wrap the yarn around the cardboard ring one time and tape it one, or glue it for a less messy look.
  4. Glue the rim of the ring and place it in the center of the inside paper plate and hold it for a little bit, then repeat the step with the other plate to make the structure look like a yo-yo.*
  5. Let it dry.
Here's the finished product:


*Note when I first did it I taped the roll between the two plates. I would not advise it it didn't hold very well and it made the whole thing just look a crap mess.

Tuesday, July 7, 2015

Y Week- Yellow Sun

Today my kids and I are working on a new decoration for my classroom door. I only had 5 students today but I wanted as many kids as I could to participate in the door decoration.

What you'll need:
  • Orange and Yellow paint
  • A large piece of paper
  • Tape
  • Paint Smocks
What to do:
  1. Take the large paper, roll it out over a table and tape it to the underside of the table.
  2. Give each child a spot at the table to try and maintain a little organization.
  3. Dress each child in a smock this WILL get messy.
  4. Squirt a small amount of paint in front of each child and let them fingerpaint the whole paper, they'll love it!
  5. Find a place where something this large and this wet can dry.*


When this is dried I will cut a large circle out of it to make the center of the sun. Later in the week I am going to make orange and yellow handprints for each child to surround the sun. Since I didn't use construction paper I may have to glue it to a harder surface or laminate it. Each child's handprint will have their names on it and voila! Pop it onto the front door! I know this may not make sense click here to see the finished product!

*Note: be careful when transporting something this large and wet it rips very easily if you don't use construction paper.

Monday, July 6, 2015

Y Week- Yellow Yarn

It's Y week! So I decided to start off with the obvious... Yellow! All we did was simply color a Y yellow and glue some yellow yarn on it. Sound simple? It is!

What you'll need:

  • Scissors
  • Yellow yarn
  • a Y coloring page
  • Glue
  • Yellow crayons

What to do:
  1. Have  the children color the Y coloring page with a yellow crayon.
  2. While they are doing that, cut up some yarn. I used about a hand to elbow length then cut them to about an inch, give or take, the size isn't so important.
  3. Spread some glue onto the Y and let the kids glue the individual pieces onto the paper. They will probably need some help, yarn tends to easily stick to fingers especially once they start touching the glue.
Here's the finished product!


Friday, July 3, 2015

Making it my Own

I'm thinking about ways to redecorate my classroom. The first thing I'm going to do is put away that old radio with the cd player that skips and replace it with my iHome that I'm currently not using at home. I have some old iPods so I'm thinking I'm going to fill one with the children's music that I already have on my iTunes plus maybe some of the cds that are in the room already. My kids like the nursery rhyme, wheels on the bus type music but they also respond to the kidz bop and Frozen music so using the iPod will give me the opportunity to have a more variety of music plus I can add the nap time music right on it so I won't have to switch back to the cds.

Next week is Y week and I need to replace the door decoration to reflect the new roster of kids in my class. I'm thinking I'll tie it all together with making a big yellow sun made of handprints for the door. I'm going to take some of the things off the walls and doors in the room. We also have a line where we hang all of the children's artwork for the day. My idea is to have each child make a handprint and when they are all strung next to each other they'll form The Very Hungry Caterpillar. I feel like I shouldn't make so many changes sometimes because I am only taking over the room for the summer until the previous teacher comes back but she kept drilling into me that it's my room now and to do whatever I wanted. Plus it will make thing easier for me to organize things my way rather than having to search for wherever she kept things. I also have to come up with some new decorations for the windows, the old ones went into the childrens' books when the previous teacher left. We keep books with monthly updates of pictures and artworks for the kids and send them home at the end of the year.

The kids all know where their cubbies are and bring their nap things back to it when they wake up but with the children that are gone the cubbies will need to be moved. I'm thinking of adding the childrens' pictures to the bottoms to help them know where their things go. They currently have their names on them and we try to get them to recognize their names but they are still too little to do so. However I think that pictures on the bottom may get covered when they put their blankets away... but I guess they only need to see the pictures when they have their blankets out. I'm still mulling over these ideas I just felt like writing them down.

4th of July craft

Ok so I know it's E week but since it's the 4th of July this weekend and we are closed tomorrow I decided to do a 4th of July craft today instead. We made painted fireworks with bendy straws! I know that sounds strange but stay tuned it makes sense.

What you'll need:

  • Red and blue paint
  • Paper
  • Paper plates (or something to put the paint on)
  • Bendy straws
  • Tape
  • Glitter (optional)
(Sorry for the crappy picture it was nap time and the lights were off. Forgot the flash.)

So here we go:
  1. Gather a group of straws, I used about 10 per grouping.
  2. Extend the straws all the way out, then bend them each to a 90° angle.
  3. Hold them together so they're all sticking out into different directions, then take a small piece of tape and wrap it around the straws.
  4. Squirt a good amount of paint onto the paper plates.*
  5. Assist the child in gripping the straws and spreading them throughout the paint making sure to coat the whole length of the straw to ensure big fancy fireworks.
  6. Help the child press down on the paper with the painted straws.**
  7. We stamped each color 3 times on the paper, needing to go back for more paint after the second stamping.
  8. Optional: If you want to really make it pop add some glitter at the end for that shiny fireworks effect! I happened to have glitter paint on hand so I was able to kill 2 birds with 1 stone.
Here's the finished product!

*Note in the picture I used small paper plates but after testing the activity I found that larger paper plates were better if I wanted to coat the whole length of the straw.
** I pressed down on top of the straws with my hands while the child held them to help the straws make contact with the paper.

Wednesday, July 1, 2015

So how did my first day as lead teacher go you ask?

Let's just say... I'm exhausted. 9 two-year-olds is a lot of work. Granted I have been in this classroom for a few weeks now and was well trained by the previous teacher so I know how to do most of the things in my room. I also have an awesome boss who answers even my silliest of questions. I do have a new girl in my class who just started this week and today was just her second day. She is super nice and adorable. Her parents send her to school with all organic food and special baby wipes and stuff. She had a cup of milk in her bag and it wasn't in a regular sippy cup it was some kind of new fangled thing. I thought it was just a storage container because the top twisted on and it wasn't leaking or spilling. Anyway when I finally opened it I saw milk... chunky milk. I reflexively smelled it and it didn't smell rancid so I asked my boss and some of my co-workers. We came up with that it might be rice milk or almond milk or something but decided until I contacted her parents to ask I wasn't going to give it to her. Her last day at the school was two days ago so it stands to reason that the milk was left in the bag for two days and no one noticed it. Eventually I got her dad on the phone and he said it was some kind of special milk his wife bought that had cream that floats to the top and it was supposed to be chunky and just shake it before I gave it to her. So when lunch rolled around and I went to give it to her I realized I didn't have a cup to put it in (all the families are supposed to provided a milk and water sippy cup if they want their kid to have milk). I decided to see if she could drink out of it as if it was a regular cup and I was surprised that she could and without resisting but I still sat by her while she drank it. When her dad came to pick her up I asked him about her not having a cup and he explained to me that that WAS a sippy cup and she could have drank out of it with the top on... I don't know how. I turned it upside down and stuff and nothing came out. All these new fangled gadgets and devices for kids. Too much.

Aside from the sippy cup debacle the day went pretty well. I was originally intended to have only 5 kids in my class starting this week which is the ratio to which a teacher is allowed to be alone with kids that age. Let me break this down: When the previous teacher was here we had 10 kids. Subtract 3 that were supposed to move up to the next age classroom and 2 that were supposed to be unenrolled for the summer. That leaves us at 5. One of the ones that we thought was unenrolling for the summer is actually not, my boss misunderstood the parent so that puts me back at 6, plus my new student that just enrolled 7, plus none of my 3 that were supposed to move up have yet and my boss seems like she's deciding one of them will not be so that leaves me back at 10 somehow.

One Step Closer

I am slightly embarrassed to admit that it took me 3 tries to pass one of my certification exams but today I FINALLY got a score report with a passing grade on it. In layman's terms I passed my last exam and I am officially ready to apply for my certification! I don't know if you know, but initial certification these days takes a lot of requirements. 6 seminars, fingerprinting which costs close to $100 plus the money you have to pay whoever does the printing, plus a whole gang of exams of which ones are required keep changing so some of the ones I did pass don't even count for me anymore. Anyway my point is it's been a long hard road and I'm one step closer to having my own classroom in an elementary school. One day... One day.

E Week- Elmo

For my first project with my two year olds went well if I do say so myself. This week we are working on the letter E so I had the children make Elmo. 2 year olds love Elmo. One of the things I am trying to work on with myself is making sure my activities are developmentally appropriate. For you non-teachers that means I over-complicate my activities. So here's what we did:


What you'll need:
  • Red and orange streamers or tissue paper
  • Red and orange crayons
  • Glue
  • A picture of Elmo
  1. Print out a coloring page of Elmo
  2. Give the child the red crayon and have them color in Elmo's face (they'll scribble all over it but that's what we want)
  3. Use this as a teachable moment and have the child identify colors and Elmo's nose! Have them color Elmo's nose orange.
  4. Rip up the streamers into small pieces and spread a lite amount of glue onto the red parts of Elmo's face.
  5. Have the children grab the small pieces of streamer (I chose not to hand it to them. Fine motor practice) and set it on top of the glue wherever they want and tap it into place to make sure it sticks.
  6. Repeat step 5 with only one piece of orange streamer for Elmo's nose.


Here's (my) finished product!